Saturday, February 10, 2018

Clutch Archipelago 7

Do you like streamer fishing? With those big things flying in the end of the line. I gave it a shot  a while back but soon figured out it's not my ting. To me, flyfishing stands for a refined and laid back approach on the water. You know! like that old lady making chi gong moves somewhere in the kingdom of the sun. I couldn't get that feeling with those big patterns and flylines in odd dark colors. But I couldn't help myself building a rod that many flyfishermen like when it comes to this kind of activity. A Clutch Archipelago!


Well! The fact this blank are made by in the US doesn't come as surprise.  Actually, the action are about the same as many US spin and jig rods. Just beef up the butt section a tad and tame the tip a notch or two and there you are. To make a long story short, I surprisingly got the hang of this fast action bullet after some time and find myself longing for bad weather and howling winds. I praised that strong backbone and soft tip when the weather conditions where at it's worst. But then with a normal size fly not a big fluffy streamer creation.


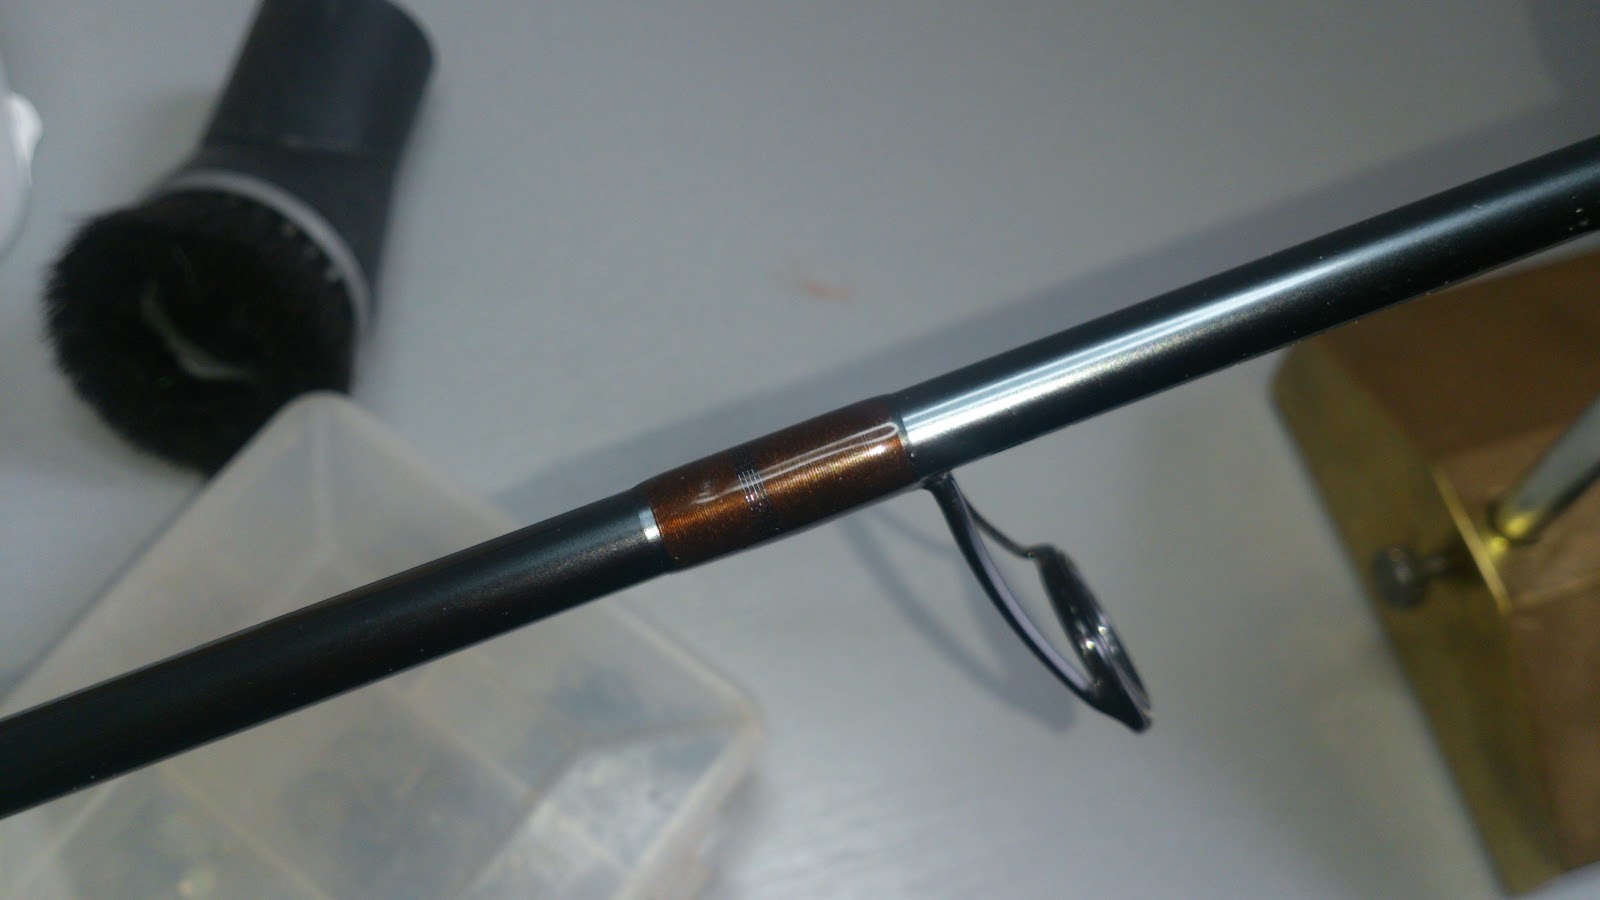
The finish of the blank where nice in plain matt carbon. It's a really light blank but yet feelt robust and the rods joint where nice and tight. The Clutch Archipelago are a great blank if you like fast action, stiff butt section and a relativ soft tip. Streamer fishing in grand rapids and big windy waters are just right. But if your seeking a sensitive tool down by the troutstreams and lakes and want a rod that produce a lot of feel and chi gong this one are probably not for you.


Blank: Clutch Archipelago, 7-weight
Handle: Supreme cork and rubbercork
Reelseat: Struble U-15HG
Guides: Fuji LNAG, H&H snakes
Thread: Prowrap, 850
Finish: Flexcoat
Rod Weight:105 g
Tipsize:1,6 mm (4.0)
Windingcheck size: 9 mm ( app. 30 cm from the butt)


Tings don't always turn out the way you want. One day fishing for big browns in fast rapids I got hooked up by a really big fish and it all ended with a broken rod and no catch. That's life!
What makes me disappointed though are the way Clutch company handled my request for a new rod piece. They promised to get me a replacement but never followed through. After a lot of mails and 6 months later I gave it up and my local dealer SNÄJK refunded the cost for the blank. Great goodwill! But as for the clutch rod company I urge customers to think twice dealing with them. At least if your outside the US.


Go for the big ones!
Pirate fishing!


Friday, June 9, 2017

Tempel fork outfitters BVK 7-weight

After building and fishing some 6 weight rods I decided that I needed a rod that could handle more harsh weather condition and larger flies. Price was not I issue, I could have spend a lot to get a blank that suited my needs but after searching the web I couldn't help to notice the good reweiws that the BVK from TFO was getting. I rember casting a TICR modell from them over 10 years ago and was impressed how smooth and powerful it felt. But in the end I got myself a rod from another manufacture and never tought more of it. Now I couldn't help myself and ordered a 7 weight to try it out. And when I was done reaming the fullwells handle and glued it and the reelseat in place I taped the rings on the blank and went out on the lawn to check it out. Wow! I relly liked casting this blank. Same smooth and forceful feel that I remembered back then with the TICR model in hand. But now 10 years later you could feel the progress in material and design. Lighter, more responsive and really pleasant to handle.

And after 1 seson by the sea and some fishing in lakes and rivers a have nothing but good to say about the BVK. The action are fast but not stiff and works somewhat down the blank. Works great with a wide range of lines. Let you get by with some bad timing in the casting stroke that happens to all casters sometimes.

The only thing that dosen't worked out that great I have myself to blame. I tryed out butt guides from a manufacturer in Korea, TAC. Not only where they thick and heavy, rust could be detected around the guidefeets and frames after only short time fishing in the salty sea. So I had to replace them with Fuji's sic rings. And the fightingbutt became to long so I replaced it with a shorter and wider one. And althou the full well handle felt alright it where a tad to beefy so I reamed more slender.


Blank: Tempel fork Outfitters BVK 9' 7#
Handle: Supreme cork and burl
Reelseat: Rainshadow
Guides: Fuji SIC, Pac Bay's snakes
Thread: Gudebrod A, Olive
Finish: Flexcoat lite
Rod Weight:108 g
Tipsize:1,8 mm (4.5)
Windingcheck size: 9 mm ( app. 30 cm from the butt)

Monday, October 3, 2016

Batson Rainshadow XSW62MX & XSW68MX!

I made two spinning rods. The blanks comes from Batson and are design with walleye fishing in mind. Now we don't have walleye here in scandinavia but a close relative, Zander or sometimes called pike-perch. Vertical fishing teqnices targeting Zander, perch, pike, char and so on have really boomed the last years here in the north  and often calls for really fast actions rods and with a lot of backbone.  At the same time there's a good thing if the blanks are made of high modulus carbon producing light and sensitive tools. These RX8 blanks from batson match all the specs you need to feel and hook fish in the vertical plane from the bottom all the way to the surface. 


Blank: Rainshadow XSW62MX
Handle: Duplon and rubber cork
Reelseat: Fuji  SK2
Guides: Fuji Alconite, KR concept
Thread: Gudebrod gold. Pac bay gunsmoke bling wraps.
Finish: Flexcoat lite 

Rod Weight:67 g

In medium deep waters and a jig head weight of 10 g and 8 pound braided line this rod feels at home. At mear 70 g it feels like a feather in hand. Don't let the slender and light sensation fool you though, there's plenty grunt in the lower parts of this blank. Fishing for perch I had a big pike snapping my plastic and before the leader got trashed the XSW62MX fouhgt hard. With a protected leader I'm convinsed that this little rod would imitate Ali when conquered the mighty George Forman. Rod KO, Rumble in the jungle!
But genarally this blank works best for smaller species than pike. You can actually cast a lure with this rod aswell not only work baits up and down so to speak even if it feels kind of boring after awilhe. If your looking for a sensitive vertical fishing tool and hunting perch and mid sized zander, this is for you.


Blank: Rainshadow XSW68MX
Handle: Duplon and rubber cork
Reelseat: Fuji TVSTS
Guides: Fuji Alconite, KR concept
Thread: Gudebrod chestnut. Pac bay gunsmoke bling wraps.
Finish: Flexcoat lite 
Rod Weight:110 g


The XSW62MX & XSW68MX have about the same specs when talking about casting weight, up to 5/8 OZ and line class 6-15 LB. In reality they are far apart. I have to admit that I never got the hang of the way the yankees rate their blanks. But I guess the fishing inviroment generally differ and the approach on the waters as well. If I would rate the XSW68MX blank I'll say the the casting or jig weight should be 1/4-1 1/4 OZ or 10-40 g. Anyway, if we let the numbers and letters on this blank a side, the XSW68MX blank have a blazing fast action with a backbone enough pulling pretty much anything swimming in our lakes out of the depths. As a spinning rod it works great for vertical techniques but let all the other things aside. I made a baitcasting rod of another MX68 blank and that made a more versital tool. Paired with a baitcaster you can somewhat cast a lure and track topwater baits. Alltough the action of this rod are to stiff and unforgiving to my liking. It works great for medium to heavy vertical fishing but that's about it. 

Wednesday, May 4, 2016

Fly Rod reviews!

After a lot of problems and hardship I have manage to finish a handful of fishing rods. I have put them to the test in genuine fishing situations as well. And hopefully there's some information or knowledge that can be of help for someone who's interested in building from these blanks. Don't hesitate to comment or contact me via mail if you have any questions regarding these rods and the building process making them.


Friday, August 9, 2013

Fly rods tuned and tested


The handles, butts and tiptops are glued to the blank. The process when building rods from now on change character. From grabbing hold on things it’s time to show a gentle touch and fine motor skills.

Rod guides comes in a variety of shapes and material and they play an essential part how your rod going to perform in the end. Not only how they are design but where you place them on your blank makes difference. I been messing a lot with rod guides trying to understand how they impact a rods performance and when it comes to fly rod guides I’ve saddle for a couple of things.


I prefer the American pattern snake rings, those with an oval shape. They are strong, keeps the fly line centered in the guide and preventing line from touching the blank too much. Now there’s nothing wrong with single legged rings but those times when I tested fly rods with single legged guides they seemed less effective. The fly line had a tendency to cling to the blank when casting and create more friction. Now, that’s only my experience and if you like them and the idea of a single guide who will save you a couple of grams in less wrapping and rod finish, those guides are for you.

There's some companies that manufacture guides for fly rods. For this build I choose Saymo guides from H&H company in Great Britain. They are known to stand up to really harsh environments and salty waters. And as my two rods are expected to be used in saltwater they will suite me just fine. 

Another thing when talking of fly rod guides is what size you should choose for your build. My experience tells me, keep them as small as possible. Maybe your rod wan't cast longer than using larger guides but perform more controlled with higher precision. And thereby feel more easy and pleasant to cast.

For my build of a six weight rods I picked size 1 running guides down to a “chocker” of 4 size and a 12 mm stripper guide. I could have used the 1/0 size running guides but with the risk of leader knot problems. So the 1 sized running guides will likely work great.

And another thing I’m going to test this time is lighter guides in the top of the rod. What I hopefully gaining by keeping the tip of the rod as unaffected as possible are a responsive and light feel when casting. The down side could be that they ware out and I have to replace them long before the pension day of the rod. Only time will tell.

Enough said about that, I can hardly wait to cast my rods but first I will do a static test to decide where to place my guides to be as effective as possible.


The static test is time consuming but if done right you will get a rod that cast at it's full potential. The other way around, when the guides are badly placed you put huge stress to blank and even risk the blank to brake. 
The rubber "grips" in the pictures are quit handy when moving the guides in different positions. They are easy to make yourself, just some rubber band in a suitable size and and something preventing them from slipping. 
I'll start by placing the stripper guide where I like it and used to when casting. That's around 79-82 cm(31-32 Inch) from the butt of the blank and the rest of guides I place about equal distance along the blank to the the tip top. This time I used 12 guides in total to start with. 
The aim of a static test are to get the fly line to follow the bend of the blank in a natural way.


So you have to find something that can hold the blank in a position that enables you to put load to it. I have modified an old rod holder. Then I place wight in the top of the blank. That's done by gluing the tip top in a earlier stage and now tying a PET bottle with some water to it. How heavy should the load be? Well, the pressure a fly rod have to handle varies trough the cast, it acts like a catapult so to speak. The only constant load are when you have a fish on the other side of the line. So I'll go for something in the middle and put on a decent amount of pressure but not near fully loading the blank.
After mounting a fly reel and sliding the fly line trough the guides I start moving guides from the tip top down the blank to find a nice curve of the fly line that follows the bend of the blank. And with 12 guides in total its easy to find that curve so I remove one of the running guides and start all over. The curve with 11 guides are still great. So I remove another guide and do the work ones more. With 10 guides the curve is still good but with 9 of them there's a couple of spots creating angels a bit far from the bend of the blank, no matter how I'm trying to tweak and tune the guides. So I'll go for a the lightest and an acceptable set up and use 10 guides in total. 


In the picture above I'll mounted a sage Z-axis 690 rod just to show the bend of it and the placement of the guides. The curve of the fly line could be better though it will work. And if compared to the bend of the sage, the blank from Dan Craft shown in earlier in this post differs quit a bit. Loaded with same wight the sage Z-axis have a rather deep bend. The FXLT from DC reveal a really powerful casting tool. In the same time I think it will really challenge the technic of one casting it.

Talking about casting, the time has come to take my two rods out for the first ride. So I wrap some masking tape to protect the blanks and to temporarily attach the guides to them using the static test scheme .  


The CTS affinity X turned out great. Fast, really smooth and with controlled action. Unfortunately I couldn't somehow get the hang of the Dan Craft rod. It felt kind of raw and just not comfortable in my hand when casting. So I reshaped the handle a bit for a more ergonomic feel and tweaked the setup of the guides. And after some time testing things it felt better. Altho somewhat cranky to handle the rod kicks like crazy when you treat it right. But I think I'll have to work some to get along with this one.
Now all that's left for this rod build are to prepare the guides, wrap and finish them. I leave that for another post. 

Pirate-fishing

Sunday, July 28, 2013

Reaming the handle and creating some other stuff.

I’ve learned there’s different ways to make a handle fit the diameter and taper of a rod blank. 
You can ream cork rings, glue them directly to the blank and than form the shape you want. But if something goes wrong along the way doing so, you’re in for a lot of mess to take care of. You can also ream the rings so they will fit the blank, glue them to a taper steel rod and form a handle. To much work if you ask me, when you can take an easier way out.


The pictures shows the way it's done. My handles are shaped but don't have reamed holes to fit the blank so that only leaves two options. Ream by hand or use some kind of power source. Already having an electrical drill the only thing needed is some kind of rod reamer rod. Now there’s maybe a old or broken fishing rods lying around somewhere that could come in handy. If this is the case, now is one of those occasions.


If it happens to be of similar taper and size, strip it  and glue a short piece of metal rod in the thick end. Now the reamer blank can spin in in the jaws of the drill. To finish the job, high quality emery cloth ripped in long and narrow strips glued down to the reamer blank with contact cement. There you have it. Just push and lock the drill power button and ream your handle to the spot where it fits your needs. It works great. The sharpness of the reamer will likely fade after awhile and needs new strips of emery cloth. Just clean the reamer blank and do the trick all over again.
You can also use the reamer when choosing cork or cork based product as a part on your reel seat.

Here you have a skeleton from Batson and brown burl cork.  Great for saltwater application when you want to keep a low weight. 

At last all is done and ready to be attach to my fly blanks.


For this build I had to make some new stuff. I been moving to a new place quit recently and there seemed like some old rod building stuff ended up lost along the way. But that's life, so better start making new ones than cry over spilt milk. 
One thing that comes quit handy are some kind of clamp when assembly the handle, reel seat and other components to the fishing rod blank.  


Of course you can buy a ready made clamp from a rod building supplier but it's pretty easy to make one and don't cost much. And it provides the possibility to suite all kind of application and situations. The clamp on the picture are made for this project but can easily be modified to take longer handles by replacing the threaded rod with longer ones. You can also make slots instead of holes in the wood when you need a clamp for gluing cork rings on a non threaded steel rod.
And all you need is shown in the picture. Some piece of wood, threaded rod, wing nuts plus some really basic carpentry skills. 

A new rod finish dryer

I built a finish dryer some years back and it've suit me just fine. But I thought I build a new one that can dry two blanks instead of one as the process of wrapping and finishing a rod blank is quit time consuming. After google around and searching for different solution I made up my mind to choose a motor that runs on 12 V DC instead of 220 V AC. A DC motor can easily be speed adjusted by pulse-width modulation(PWM controller). And DC motors are quit cheap.
So I ordered two motors, a PWM controller and some other stuff from a shop in China and paid about 300 kr (50 dollar)?!! If I 'd bought the stuff I needed where I live I've had to pay tree times the amount of what I gave order from China, if not more.
Anyway, besides electrical components I needed to prove my basic skills in metal and woodwork because that's the material the dryer will be made of. It went pretty smooth, the hardest part was actually to find small wheels that could fit the minimal approach I wanted for my dryer. But he who seeks shall find what he is looking for in the end.


Raw brass plates for mounting the motors to the wood brace.

Brass plates shaped, drilled,polished and attached to the motors.


Motors placed and ready to be tested. The PWR control and the wheels will come in place when I figure out where to place the dryer. The best environment for finishing things are where there's as little dust as possible so maybe I try out the bathroom. We'll see!


Til next time!

Pirate-fishing